Taking a screenshot means it just an image of the screen what you captured. Capturing a screenshot in any Windows Operating System is almost the same as in newer version of Windows 11 or Windows 10. There are several way of taking screenshot in Windows PC which I’m going to share with you right here in this article.
I have also described the way how you can take a screenshot and decorate it beautifully for your Blogs, clients PPT Presentation, e-Books on any topic. You can also refer Table of Content below for easier understanding the article.
Table of Contents
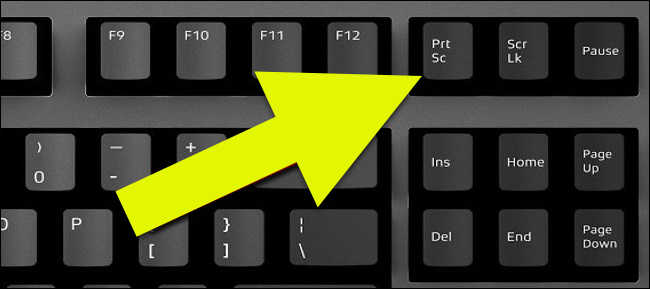
Print Screen Key
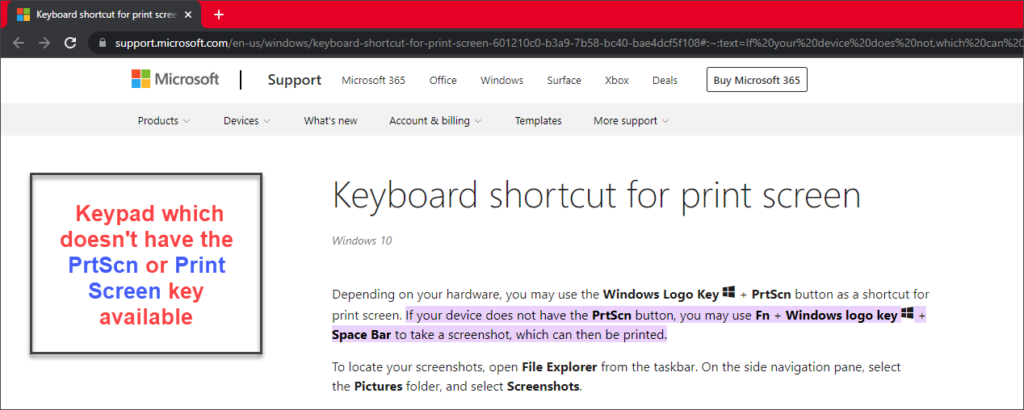
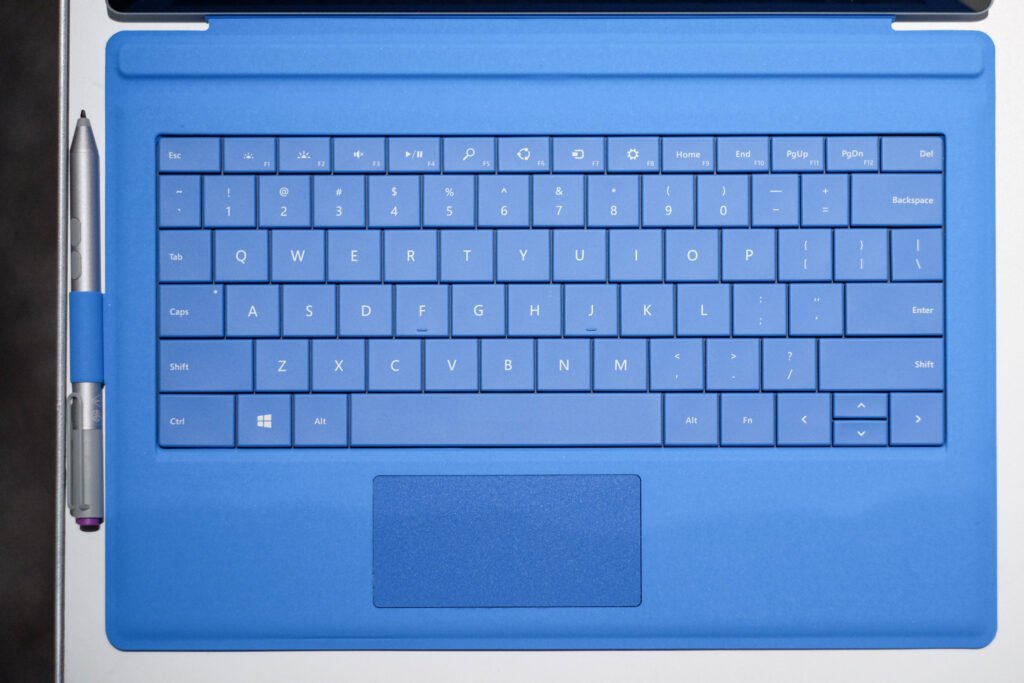
This Print Screen key is available on top of the right area on all type of full size keyboard and Laptop keypad named as PRTSC or PRNT SCR. But may not available on some small size keyboard like Microsoft Surface Laptop and Laptop which doesn’t have Numeric keypad. But don’t worry we have different way to take screenshot on these computers. See the image below from Microsoft article.
Just follow all the alternative methods described below which suites you better in taking screenshot.
Method to take screenshot via Print Screen key
It is a very simple method and commonly used by most of the user. First you have to be on the screen window which you want to capture and press the PRTSC or PRNT SCR button from your keyboard and done. Now you are ready to Paste it in any image editor software application like MS-Paint, Photoshop or even in Microsoft PowerPoint for your slides. And once the screenshot appear decorate it as you want and then save it.

File Format
When you paste it in MS-Paint and then save it, you have multiple option to choose from. Like JPEG, BMP, PNG and TIFF etc. As you can see in the image below. Recommend way to save it in either PNG or JPEG is the most preferable way to save the screenshot in that file format and share it with your collogue, friends and family.
Size
It depends on type of the file format you choose and also depends on resolution of the screenshot. But in an average TIFF and PNG may have the large size and JPEG file format may have the small size of the same screenshot that you have captured. JPEG is best suited for sharing, creating Presentation and for e-Books. And PNG and TIFF is best suited where the quality of the image is matter.
Resolution
Default Fullscreen screenshot image size depends upon the current resolution running on your computer.
Path
You define the path when you save it.
Window Key + Print Screen Key
These both key is available on almost all type of full size keyboard and Laptop keypad named as WIN key and PRTSC or PRNT SCR. But PRTSC or PRT SCRN button may not available on some small size keyboard.
Method to take screenshot via WIN key and PRTSC
Very useful if you are in hurry and just want to take screenshot and save it. For then very useful shortcut key Win + Print Screen for you. First you have to be on the screen window which you want to capture and press and hold the WIN key first and then press PRTSC or PRT SCRN button and done. Or we can say Win + Print Screen key. It will take the screenshot and save it under Screenshots in Pictures folder of current logged-in user account.
One time your screen will be flicker while screenshot in taking place.

File Format
It saved the file automatically in the PNG file format.
Size
It depends what type of screen window are you going to capture. If the screen having text mostly then the file size will be small and if the screen having graphic in most area then the file size will be larger.
Resolution
Default Fullscreen screenshot image size depends upon the current resolution running on your computer.
Path
Default path is current logged-in Users -> Pictures -> Screenshots folder.
XBOX Game Bar
For gaming users it is a best tool to use it for several gaming work which already included in Windows 10 and Windows 11. But you know you can use this tool to take screenshot as well. This XBOX Game Bar will work on Windows 10 and Windows 11 only.
Method to take screenshot through XBOX Game Bar
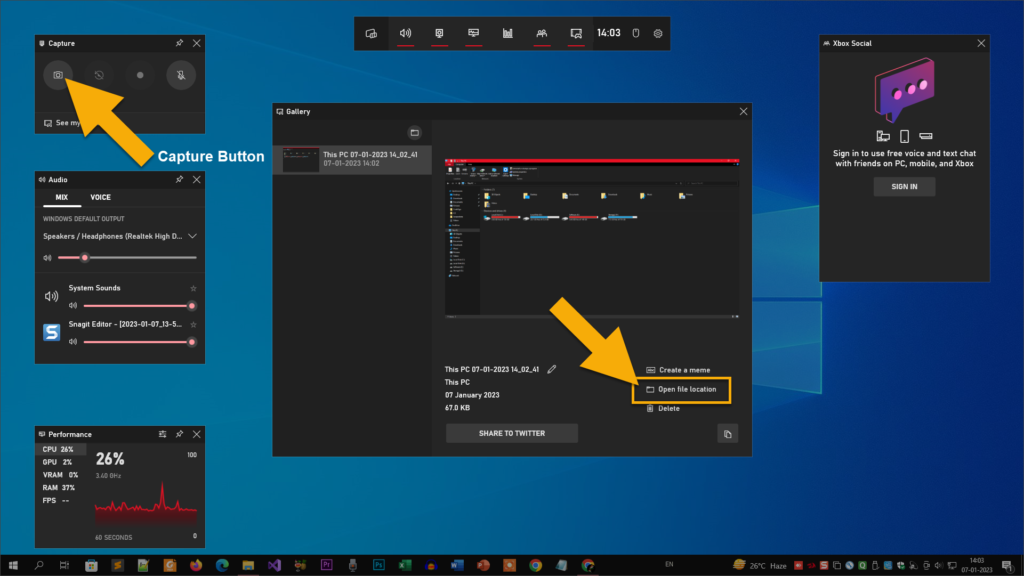
You just need to be on the desired window screen and press Win + G and Game Controller bar will be appear. In Controller bar you have to click on Capture button which show you the Capture window.
When you click on Take Screenshot button in Capture window it will take the screenshot. Shortcut key you can use it is Win +Alt + PRTSCRN (Print Screen Key). One drawback of this Game Bar is, it is not taking the screenshot of the Taskbar panel.
File Format
It will save the file automatically in the PNG file format.
Size
It depends what type of screen window are you going to capture. If the screen having text mostly then the file size will be small and if the screen having graphic in most area then the file size will be larger.
Resolution
Default Fullscreen screenshot image size depends upon the current resolution running on your computer.
Path
When you click on the Capture button, screenshot saved automatically and show the file in Gallery window. In Gallery window you can click on Open File Location button, which shows you the saved path for your screenshots file. Or we can say default path is current logged-in Users -> Videos-> Captures folder.

Snipping Tool
This tool is very useful if you want to take simple screenshot as clipboard. And you can Paste it anywhere in the image supported apps or software. Like you can take simple screenshot via Snipping Tool and quickly paste it in Microsoft Outlook for sending mail or you can quickly paste in MS-Paint for editing purpose. This tool was introduced in Windows Vista and continue coming in the later version of any Windows OS. But now Microsoft recommending the new tool which is Snip & Sketch which have lot more feature than Snipping Tool. See below further about Snip & Sketch tool.

Method to take screenshot through Snipping Tool
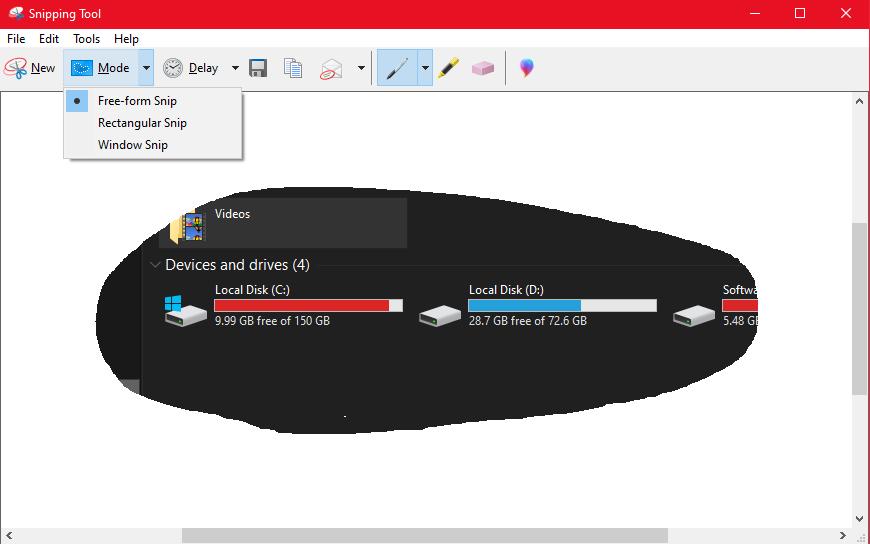
Just type Snipping Tool in your Search bar and you will see the Snipping Tool already installed with your Windows Operating System. Just launch it and take screenshot via this tool by clicking on New button.
Tip :- You can define your way to take screenshot via Mode feature. Like Free-form Snip, Rectangular Snip, Window Snip and Fullscreen. Just try this modes and achieve your desire screenshot area of the screen by dragging it via Mouse.

File Format
You can define the file format for your screenshot as it depends on whether you want to save it or you want to send or share it. PNG, GIF, JPEG or JPG and MHT file format is supported by this Snipping Tool.
Size
It depends what type of screen window are you going to capture. If the screen having text mostly then the file size will be small and if the screen having graphic in most area then the file size will be larger.
Resolution
Screenshot image size depends upon the current resolution running on your computer or the captured area.
Path
It depends because you can paste quickly in any other app or software or you can send or share it. But via Snipping Tool we can say the default path is Pictures folder of current logged-in user or you can also define the desired path for saving it.
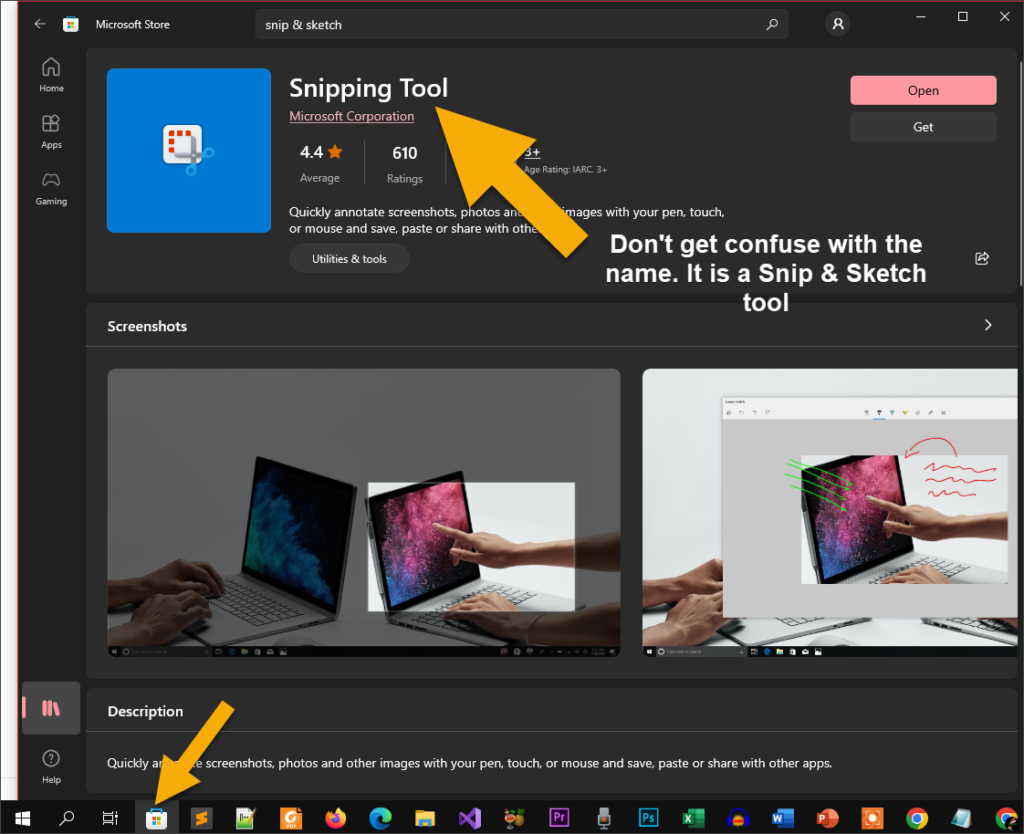
Snip & Sketch
This app is specially designed for taking screenshot by Microsoft and it is available to install via Microsoft Windows App Store. Just you need to go in the Windows App Store in Windows 10 and Windows 11 and install it from there if it is not installed.
Method to take screenshot via Snip & Sketch
First you have to be on the screen window which you want to capture and press the PRTSC or PRNT SCR or the shortcut key Win + Shift + S. It will open up the Snip & Sketch app for you. And now you can first define your mode to take screenshot. Like Rectangular Snip, Free-form Snip, Window Snip and Fullscreen. And after that you are ready to capture the screenshot by dragging it via Mouse.

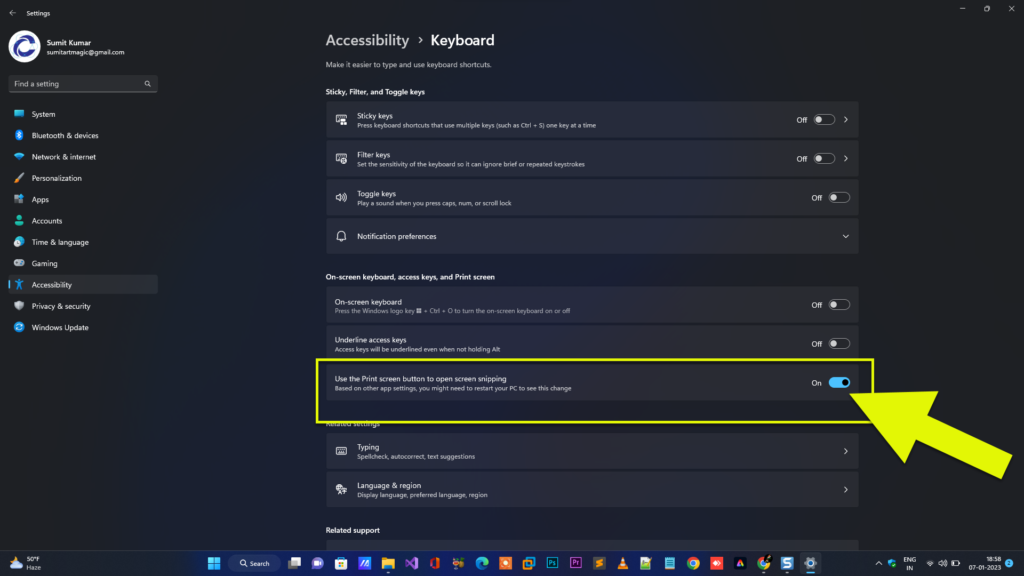
If the app is not opening in your PC check it is already installed in your computer or not. If it is not installed, install it via Microsoft Windows App Store first. Also one setting you will have to check and it must be On in the Settings -> Ease of Access -> Keyboard -> Print Screen shortcut. because the PRTSC or PRNT SCR button may overridden by other screenshot app. You may need to restart the PC after that. See the picture below.

Q :- Which is better in between Snipping Tool and Snip & Sketch? Right!
We can say both are better. It still depends what you want in your screenshot. The major difference in between both these tool is Ruler and the Crop feature in Snip & Sketch tool. That’s the reason Microsoft recommending to use Snip & Sketch for taking screenshot and its easier as well. Also the File Format extension MHT which is not included in this Snip & Sketch tool whereas Snipping Tool having this MHT extension.
File Format
You can define the file format for your screenshot as it depends on whether you want to save it or you want to send or share it. PNG, GIF, JPEG or JPG file format is supported by this Snip & Sketch tool.
Size
It depends what type of screen window are you going to capture. If the screen having text mostly then the file size will be small and if the screen having graphic in most area then the file size will be accordingly larger.
Resolution
Screenshot image size depends upon the current resolution running on your computer or the captured area.
Path
It depends because you can paste quickly in any other app or software or you can send or share it. But via Snip & Sketch tool we can say the default path is Pictures folder of current logged in user or you can also define the desired path for saving it.
Snagit
Best ever screenshot tool in our opinion if you’re a screenshot lover giving it to the next level of your imagination. It is a tool by TechSmith and created a wonderful screenshot software by which you can fulfill your desire in taking and creating of screenshot. So that you can impress your viewer, clients and your collogue. As an example you are reading this blog with some described images is also taken by Snagit.
We strongly suggest you to use this tool and define the way you want to pay attention on your screenshot. You must use this tool while taking screenshot and editing it via Snagit Editor. After editing screenshot via Snagit Editor you can post it on your Blog, Books, PowerPoint presentation etc.
Method to take screenshot via Snagit
You need to download the Snagit first and install it on your computer. Now you can open up an app via Start menu or typing the Snagit in Search button.
It will now open up the Snagit where you can click on Capture button to take screenshot. But before doing capture any screen we strongly recommend you to go with the lots of Settings first so that you can configure these settings as per your requirement. And then you can take lovely screenshot with the applied settings. Edit it via Snagit Editor as per your needs and then save or share it.
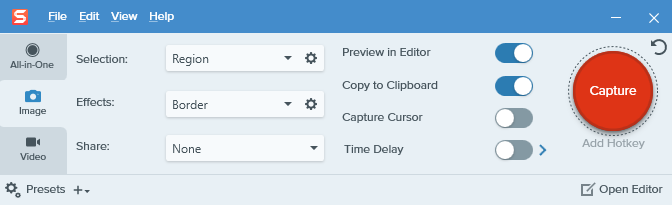
Before saving and sharing it, you just play around the lovely settings of Snagit and Snagit Editor then save or share it. And we hope you will just love this tool while using it. Use Snagit whenever you want to take screenshot and edit in Snagit Editor.
File Format
SNAGX and SNAG the major file extension of this Snagit screenshot software. And also you have lots of file type extensions which other above tool does not have these much. Like SNAGX, SNAG, PNG, JPG or JPEG, BMP, CUR, GIF, ICO, MHT, PDF, PSD, RAS, TIF, WFX, WMF, WPG, TGA, EMF, EPS and many more in later version.
Size
It depends what type of screen window are you going to capture. If the screen having text mostly then the file size will be small and if the screen having graphic in most area then the file size will be accordingly larger. And off course the extension of the file type while you save it.
Resolution
Screenshot image size depends upon the current resolution running on your computer or the captured area.
Path
By default path is Snagit folder under the Documents of current logged-in user.
Also it depends because you can copy & paste quickly in any other app or software or you can send or share it.
Hope you guys like our article.
Sumit Kumar
An author of this blog!!!